Tuesday 22 March 2011

Light it up

So i've was thinking about how to light this fool since we had a very interesting mini lecture at uni about texturing and lighting, mainly the three point set up and Kelvin showed us some new render techniques which looked totally bas ass.
I'm looking for something quite stylized so the lighting doesn't have to be hyper real, i would prefer if it just showed of the style of the models. I quite like the clinical look for the school aswell, i think this would reflect how boring everyone finds it and bring the action to the characters. i have found an example of lighting and rendering I really like, this is a snapshot from the children's TV show Pocoyo.
What i like about this is how real the models look, obviously not anatomically but it looks like you could pick up and play with the models, i would very much like this look for my animation but with background scenes aswel.
This was my first attempt at lighting using two lights.


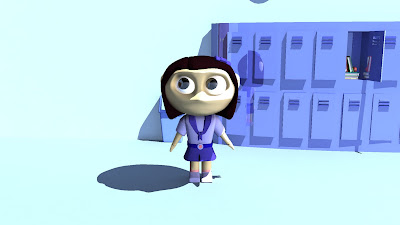
So yeah, this is pretty bleached, i forgot to play with the intensity and brightness of the lights, heres my first go at 3 point lighting.


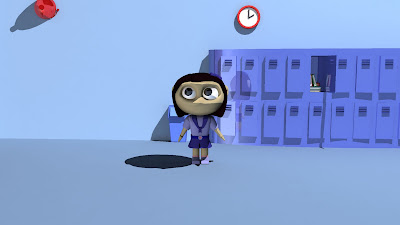
Well it's not bleached any more and i quite like the light that's hitting the lockers, looks like it's coming in from a crack in some blinds or summat, heres a go using two directional lights with a slight coloured filter on them.


I really like the shadows on her face on this one but the light on the back wall is waaay to harsh, it's still looking to CGI'd aswel. Just like the rest of this project i could mess around with the lights for weeks so i tried a daylight simulator in the MentalRay render plug-in that i briefly tried before i'd coloured the models, heres how it came out.

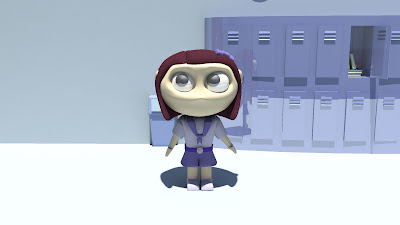
Sweet jesus that looks awesome, obviously the floor is bleached out a little but the rest of the colours look so grounded, the model looks really solid and the reflection in her eyes is amazing. This is exactly what i was looking for.

Weight Painting

This subject pissed me off so very much that is does not even deserve a humorous title, painting weights is where you tell the skeleton which joints will affect which parts of the model when i move them. You gotta do this by manually painting in white which areas are affected, this went wrong around 7 million times, mainly because it took me days to figure out that you can't paint negative weights. I'm sure if you're reading this you have no clue what the fook i'm on about, hopefully this'll help.

So the white area is what will bend when i move the related joint, it's definitely as boring as it sounds. The better it's done though the more natural the animation will look.

Sunday 20 March 2011

Riggin' Hell

Oh my f**king god, rigging is the worst thing i've ever done in my life, even as i'm talking to you now things are going wrong with the rigging for this character, this is definitely the most i've learnt in such a small space of time though, also i can see the enormous potential in this skill. This was my first shot at making this lady a skeleton.

You can see here that i already had a problem with shoulder joints that are waaay too big, i know how to fix this though i just don't have a middle mouse button. I did however manage to figure out how to make controllers, you can just about see the rectangle around her left foot, this means that i can control her whole leg just by moving her foot and it bends at the knee like a leg would. If i had all the time in the world i could rig controllers for all the limbs but because she only has a few joints i can just control her by manipulating these.
once i imported the character to the scene though i had a problem scaling her down and then all hell broke loose and i started to cry. Since then i have had to re-rig her several times but that meant i was able to make a few improvements.

I have now gotten the hang of creating a skeleton for a character, like i said i wish i had more time to rig it as well as possible but all these unforeseeable mistakes (apparently we learn from them) made it impossible. I did add a joint in the hands though so now she can bend her fingers and hopefully grab things

Locker and loaded

It almost makes me feel sick that im trying to re-create something that i hated so very much, however i should of thought about that when i decided to make a school based animation. I was looking for a pretty simple design on the school corridor, kinda like the character, quite cubic but with rounded edges.


I was looking for a slightly warped perspective feel which this has but i had trouble rounding off the edges whilst maintaining the hard edges for the locker doors. Decided to go in a different direction.


You cant see it too well here but i replaced the cubic lockers with a long oval one and it looks far more stylized now still in keeping with the soft edges though.


Added some details here to the hallway, i've also made one locker door able to open so the character can interact with it, need to fill that with books and what not, it also needs to contain a "contract" for her to undertake.


What have i created!?

Here we go then, got my final design for my main character down so here's the progression of the modeling, tried my hand at modeling before but never on a character i've spent so long designing also i didn't have a polygon limit so it was fun. Warning though, she looks absolutely terrifying until she has been textured.

What a babe, big fan of the eyes but i had to take measures with the mouth. I told ya she looks like something out of 'The Fly'.

Lookin' pretty broad here so i took her chest and waist down, she does have to be able to beat peeps up but not break them in half.


Pretty much done here, got a few tweeks to make, also i realised her hair should of been in a side parting not a centre parting.

Yo yo yo, here she is, added a bow instead of a hair band, also whacked a flower belt buckle on there. I'm really happy with how she worked out, definitely room for improvement on the hands and feet but i'm working on a pretty tight schedule here so this'll do, may come back to her later.